_.png)


The Sweetest Valentine Craft: Personalized Heart Sunglasses Kids Will Treasure
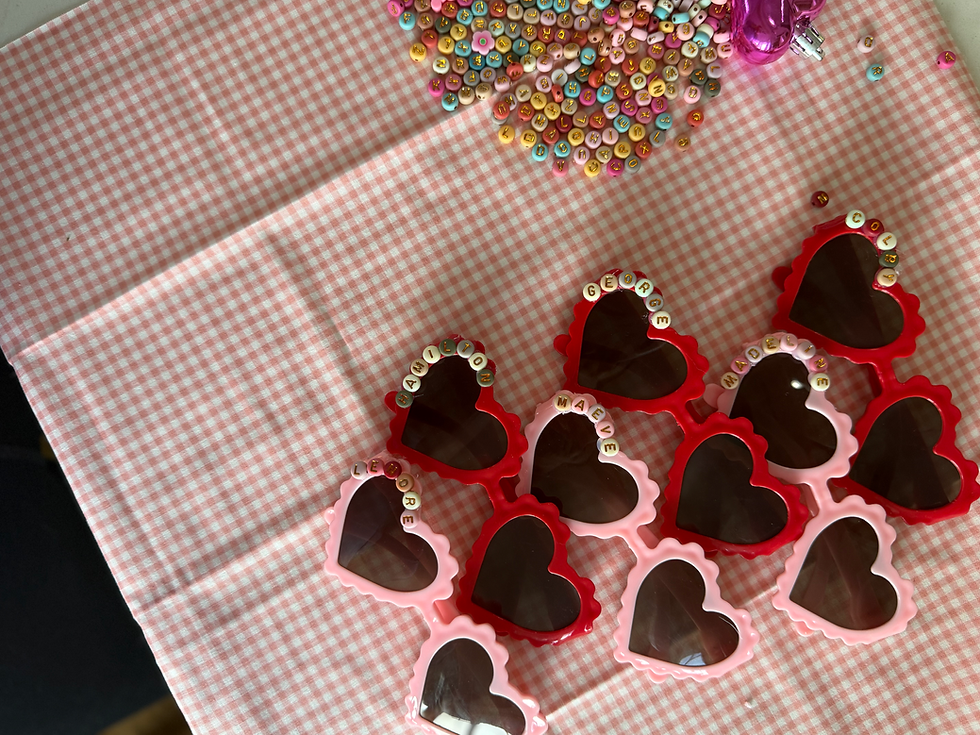
There are some crafts that are cute in the moment… and then there are crafts that instantly become keepsakes.
These personalized heart sunglasses fall firmly into the second category.
With their retro shape, glossy colors, and tiny name beads spelling out each child’s name, these DIY Valentine sunglasses feel playful, stylish, and sentimental all at once. They’re the kind of craft kids immediately want to wear, parents want to photograph, and everyone wants to keep long after Valentine’s Day is over.
Whether you’re planning a classroom Valentine activity, a kids’ party, a Galentine’s gathering, or a cozy craft afternoon at home, this is one of those projects that feels special without being overwhelming.
And the best part? They’re surprisingly easy to make.
Why Personalized Crafts Feel So Much More Meaningful
There’s something powerful about seeing your own name on something you created.
For kids, personalized crafts aren’t just “cute projects” — they become:
A confidence boost
A sense of ownership
A memory attached to a moment
A tangible reminder that they’re seen
When a child puts on sunglasses that spell their name across the top, their entire face changes. Pride shows up instantly. So does joy.
And from a parent perspective, this is exactly the kind of craft that:
Feels thoughtful
Looks elevated
Photographs beautifully
Becomes a keepsake instead of clutter
These heart sunglasses manage to feel trendy, nostalgic, and meaningful all at once.
What Makes These Sunglasses So Perfect for Valentine’s Day
Heart-shaped sunglasses are already adorable. But when you add:
Soft pinks and classic reds
Gold-accented alphabet beads
Personalized names
A cozy gingham backdrop
A hands-on creative process
They suddenly become more than just an accessory. They become part of the Valentine experience.
They work beautifully for:
Valentine classroom crafts
Preschool Valentine parties
Playgroup activities
Mommy-and-me crafting
Kids’ Galentine celebrations
Party favors
Valentine photo shoots
Holiday keepsake boxes
And because they’re wearable, they don’t end up forgotten in a drawer like many paper crafts do.
Supplies You’ll Need
This craft looks boutique-level, but the supply list is refreshingly simple.
Most of these items can be found at craft stores like Hobby Lobby, Michaels, Joann, or Amazon.
Base Supplies
Heart-shaped plastic sunglasses
Alphabet bead letters (white with gold letters are especially pretty)
Small spacer beads (optional, for spacing between letters)
Adhesive
Hot glue gun (recommended for durability)or
Strong craft glue (E6000, Beacon 527, or similar for adult use)
Optional Add-Ons
Tiny pearl beads
Gold spacer beads
Mini heart charms
Stickers
Glitter glue
Decorative storage tray for displaying finished glasses
If you’re doing this with multiple kids, set everything out in shallow bowls. It instantly feels like a creative studio instead of a chaotic craft pile.
Step-by-Step: How to Make Personalized Valentine Sunglasses
Step 1: Lay Out the Names First
Before any glue is involved, start by arranging the letter beads in order on the table.
This helps with:
Spelling accuracy
Visual spacing
Making sure you have all needed letters
Avoiding frustration later
Let kids participate in this step if they’re old enough. It helps them feel involved and builds letter recognition at the same time.
Step 2: Decide on Placement
Most people place the beads along the top rim of the sunglasses. This creates a balanced, stylish look and keeps the name readable when worn.
You can test the layout by resting the beads across the frames before gluing:
Centered for symmetry
Slightly arched to follow the curve
Even spacing between letters
There’s no single “right” way — which is part of what makes each pair feel custom.
Step 3: Begin Gluing One Letter at a Time
Using a hot glue gun (adult supervision required), glue one bead at a time onto the frame.
Tips:
Work slowly
Hold each bead for a few seconds until secure
Avoid excess glue so the finish stays clean
Glue from the center outward for best symmetry
If using craft glue instead of hot glue, allow several hours (or overnight) for drying before wearing.
Step 4: Add Decorative Spacers (Optional)
If you want to elevate the look even further, you can add:
Tiny gold beads between letters
Pearl beads at each end of the name
Mini heart charms on the corners
This is where older kids especially love getting creative and making their pair feel “designer.”
Step 5: Let Them Fully Dry
Once completed, place the sunglasses on a tray or flat surface to dry completely.
This is a great time to:
Take photos of the finished designs
Let kids show each other their creations
Talk about whose name belongs to which pair
Celebrate their work
Because this craft results in something wearable, kids tend to treat the drying time with much more patience than usual.
How to Make This Craft Work for Different Age Groups
Toddlers (2–4 years old)
Pre-glue the letters
Let them choose colors
Let them decorate with stickers instead
Focus on excitement and participation, not perfection
Preschool (4–6 years old)
Let them help arrange letters
Adults assist with gluing
Encourage color choice and design
Elementary (6–10 years old)
Let them fully design their own layout
Teach spacing and symmetry
Encourage independence
Tweens
Let them add charms
Encourage personalization
Offer multiple bead styles
They’ll wear these proudly
This is one of those rare crafts that scales beautifully across ages.
Turning This Into a Valentine Party Activity
If you’re hosting a Valentine gathering, this craft makes the perfect centerpiece activity.
Here’s how to set it up beautifully:
Create a Sunglasses Bar
Use:
A long table
A gingham or linen tablecloth
Small bowls of alphabet beads
Trays of sunglasses by color
One glue station (adult supervised)
Add a small sign that says:“Design Your Own Valentine Sunnies”or“Create Your Heart Glasses”
It instantly feels like a curated experience instead of just a craft.
Why Kids Love Wearable Crafts So Much
There’s something magical about crafts kids can actually use.
They’re not just making something — they’re creating an accessory that becomes part of their identity for the day.
You’ll notice:
They want to wear them immediately
They look at themselves in the mirror
They show siblings and parents
They insist on sleeping with them nearby
They want to bring them to school
That sense of pride is invaluable.
How to Photograph These for Blog, Pinterest, and Instagram
These sunglasses are incredibly photogenic, especially when styled intentionally.
Great photo ideas:
Lay them flat on a gingham backdrop
Stack multiple pairs slightly overlapping
Capture close-ups of the bead detail
Photograph kids holding them instead of wearing them
Style alongside Valentine books, candy hearts, or flowers
They work beautifully for:
Pinterest pins
Blog headers
Instagram carousel posts
Stories
Reel covers
This is the kind of visual content that consistently performs well because it feels personal and replicable.
A Simple Craft That Becomes a Memory
Years from now, kids won’t remember every toy they received. They won’t remember every show they watched.
But they will remember:
Sitting at the table
Choosing their beads
Watching their name come together
Feeling proud when they put them on
Being told how cute their creation looked
That’s the hidden power of simple crafts like this.
They become part of childhood.
Ways to Extend This Craft Beyond Valentine’s Day
The beauty of this idea is that it doesn’t have to stop with hearts.
You can recreate this for:
Summer with star-shaped sunglasses
Birthday parties with themed colors
Disney-themed glasses
Fourth of July red, white, and blue styles
Back-to-school personalized accessories
Flower-shaped sunglasses for spring
Once you know the technique, the possibilities become endless.
Final Thoughts: Simple Supplies, Meaningful Moments
These personalized heart sunglasses are proof that you don’t need elaborate setups or expensive materials to create something special. With just a few supplies, a bit of intention, and time together, you can create something your child genuinely cherishes.
They’re creative.They’re personal.They’re wearable.They’re memory-making.
And most importantly — they invite connection. The kind that matters far more than perfection ever could.


Comments